Two pieces, and the cloak is the one that matters
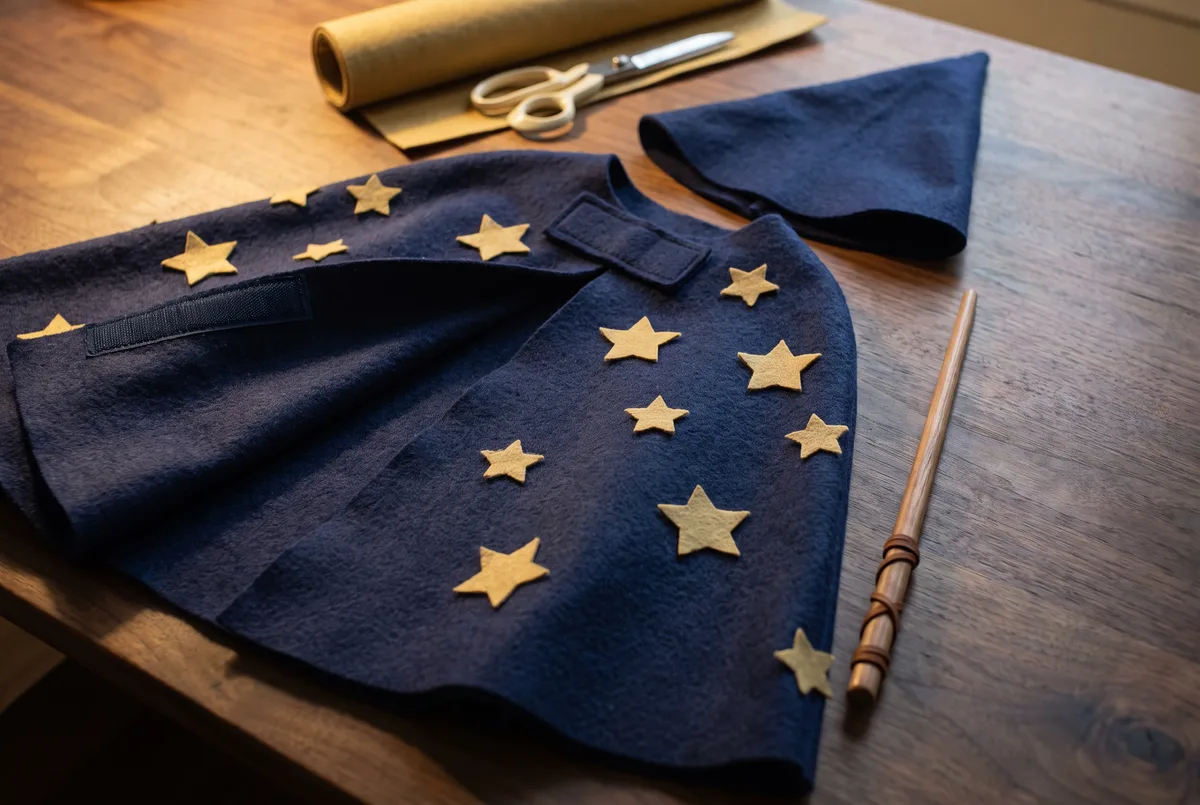
A wizard is one of the cheapest characters to make convincingly, because it is carried almost entirely by silhouette. A cloak and a pointed hat read as wizard from across a room with no other detail at all.
That makes this a good first no-sew project. There is no fitting, no fastening beyond one tab, and no pattern. The wand is the part children want to make and the part that takes twenty minutes; the cloak is the part that determines whether the costume gets worn again in March.
Build the cloak properly and the wand can be a stick with tape on it.
Fleece or felt, because edges are the whole problem
The reason most no-sew garment projects go wrong is fraying. Cut cotton and it unravels; cut satin and it unravels faster and looks worse doing it.
Fleece and felt do not fray. Both are non-woven or heavily napped, which means a cut edge is a finished edge — no hemming, no binding, no iron-on tape along a metre of curve. That single property removes about eighty per cent of the work.
Between the two: fleece drapes better, is warmer, machine washes well, and is the better choice for a cloak that will be worn indoors and out. Felt holds a stiffer, more theatrical shape, takes glued decoration beautifully, and suits the hat. Craft felt by the sheet is thin — for a cloak, buy felt by the metre rather than assembling sheets.
Jersey works too and is very comfortable, though it curls at cut edges, which some people like and some do not.
Avoid costume satin and cheap polyester lining. They fray, they are slippery to cut, they are noticeably less pleasant to wear, and they are the most flammable option in the shop — worth knowing given the number of wizards who appear at events with candles.
The two measurements
Only two numbers matter, and getting the first one wrong is the most common failure.
Length: shoulder to mid-calf, maximum. Shoulder to hip is better for a child under five. The test is stairs — a cloak that reaches the floor gets stood on going up, which pulls at the neck. Measure from the top of the shoulder down the back with the child standing normally, then take an inch off whatever you were planning.
Width: about one and a half times the shoulder-to-shoulder measurement, so it hangs and swings without wrapping. A cloak cut too narrow behaves like a towel; one cut far too wide tangles round the arms.
That is it. No armholes, no shaping, no curve at the hem unless you want one. A rectangle with a slight taper is a cloak.
A collar that lets go
This is the part we would not compromise on. The cloak must release under pressure.
Capes catch on bannisters, climbing frames, car doors, chair backs, and other children, and a closure that holds firm at the throat under those conditions is the single most serious hazard in home costume-making. CPSC treats neck and hood drawstrings on children's upper outerwear in sizes 2T–12 as a strangulation hazard for exactly this reason, and a tied cape presents the same geometry.
So: no ties, no knots, no ribbon round the neck. Use a strip of hook-and-loop tape at the collar, or a single large snap, or a loose shoulder tab. All three release when pulled.
Build it by folding the top edge over about an inch to make a collar band, fixing it with fabric glue or iron-on adhesive, and putting the soft loop side of the tape on one end and the hook side on the other. Test it by holding the collar and pulling the cloak firmly downward — it should come apart in your hands. If it does not, use a shorter strip of tape.
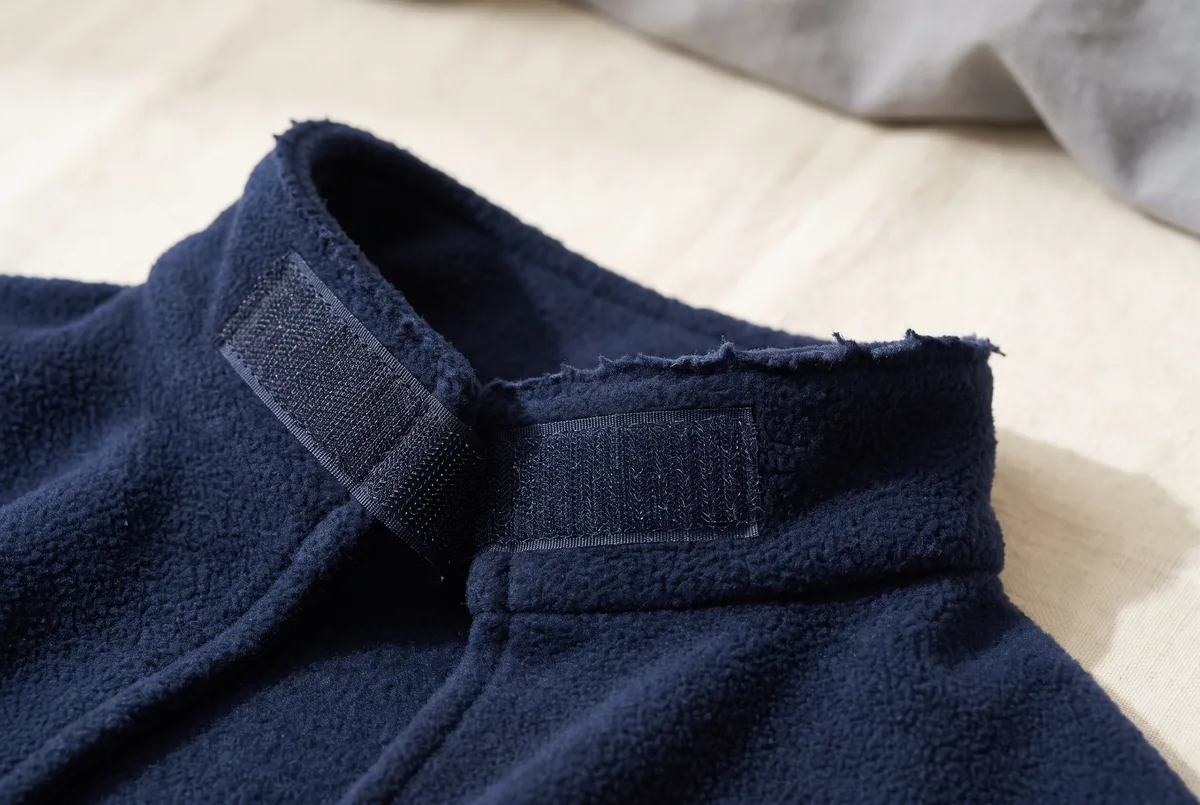 The whole closure. One wide strip, no ties, and a cut edge left deliberately raw because fleece does not fray — test it by pulling the cloak downward until it comes apart in your hands.
Decorating without stiffening the fabric
The temptation is to cover a cloak in stars. Restraint reads better and wears better.
Adhesive-backed felt shapes are the best option — they stick without wetting the fabric, stay flexible, and survive a wash if you press them down firmly. Fabric glue works well for felt or fabric shapes but needs curing time, so plan on several hours and preferably overnight; a half-cured seam fails on first wear. Iron-on adhesive gives the most durable result and is strictly an adult step.
What to avoid: hot glue, which dries into a hard, brittle patch that cracks and can leave sharp edges; and any decoration heavy enough to make the fabric hang oddly. Loose glitter has no place on something that goes near a face.
Scatter shapes rather than arranging them in a grid — irregular placement looks intentional, an imperfect grid looks like a mistake. Fewer, larger shapes photograph better than many small ones.
Matte gold on navy, silver on charcoal, or copper on deep green all look considerably more expensive than they are.
The wand
Wands break, get trodden on, and get poked. Design accordingly.
Length: roughly the child's forearm. Long wands lever against the hand, snap more easily, and become poking implements. Short wands survive.
Material: a smooth wooden dowel around 8–10mm diameter is ideal. A tightly rolled paper tube, a length of dense felt rolled and glued, or a chopstick sanded smooth all work. Avoid anything with a splitting grain.
Both ends rounded. Sand them, cap them with a felt circle, or wrap them. A blunt end is the difference between a prop and a hazard, and children hold wands at eye height by default.
Decorate with a wrapped leather or cotton cord grip, a spiral of ribbon, a felt star at the tip, or simply paint. Let paint and glue cure fully before it is waved — a wet wand transfers to the cloak you just made.
This is the piece to hand over to the child. Cutting and sanding is adult work, but wrapping, choosing colours, and adding the star is exactly the right level of involvement, and it gives them ownership of the costume.
The hat, in ten minutes
Optional, but it completes the silhouette faster than anything else.
Cut a half-circle from stiff felt with a radius of about 14 inches for a typical child. Roll it into a cone, overlap the straight edges by an inch or two, adjust until it sits on the head without gripping, then glue the overlap. Trim the base level once the glue has set.
Do not make it tall. A cone much above 12 inches from base to tip becomes a lever, tips off constantly, and hits door frames. A modest hat stays on, and a hat that stays on is worth more than a spectacular one in a cupboard.
If it slides, a strip of soft elastic under the chin — attached so it pulls free — or a small comb sewn inside will hold it.
Making it survive the year
The point of building rather than buying is that the pieces rejoin the dress-up collection afterwards. A few things protect that.
Wash the cloak before it needs it. Fleece and felt both cope with a cool machine wash; glued decoration survives if it has fully cured and was pressed down well. Test one star first if you are unsure.
Store the cloak folded flat, not hung on a thin hanger, which leaves shoulder points in fleece. A shallow bin is ideal.
Store the wand separately. Loose in a bin, it snaps or snags other pieces. A cardboard tube, a long pocket, or standing upright in a jar all work.
Keep the template. If you cut a paper pattern for the hat cone or the cloak, label it with the date and the child's height and keep it in the box. Next year's version takes fifteen minutes instead of an hour, and you already know what to change.
A cloak made to these dimensions tends to outlast the wizard phase entirely. It becomes a king, a vampire, a storm, a bat, a detective in the rain — which is the real argument for spending the effort on the cloak rather than the wand.